If you don’t already have a DigitalOcean account, you’ll want to use this link here to sign up:
https://m.do.co/c/97b9d595c7d3
If you use the special link above to sign up, you will get $100 of credit over a 60-day period.
Disclaimer
This is install guide is meant to be a setup guide for a “sandbox” database that houses non-sensitive data. This is not intended for production use, because I have not taken any security or performance considerations into account in this guide. There are absolutely no warranties, expressed or implied: Use this install guide at your own risk.
Step 1 – Start Downloading the Oracle 19c Software
Go here: https://www.oracle.com/database/technologies/oracle19c-linux-downloads.html
Download The Oracle Database 19c for Linux x86-64.
NOTE THAT YOU WANT THE .ZIP FILE, NOT THE .RPM FILE

Meanwhile, while the file is downloading to your computer in the background, go ahead and move on to step 2.
Step 2 – Create a New Droplet
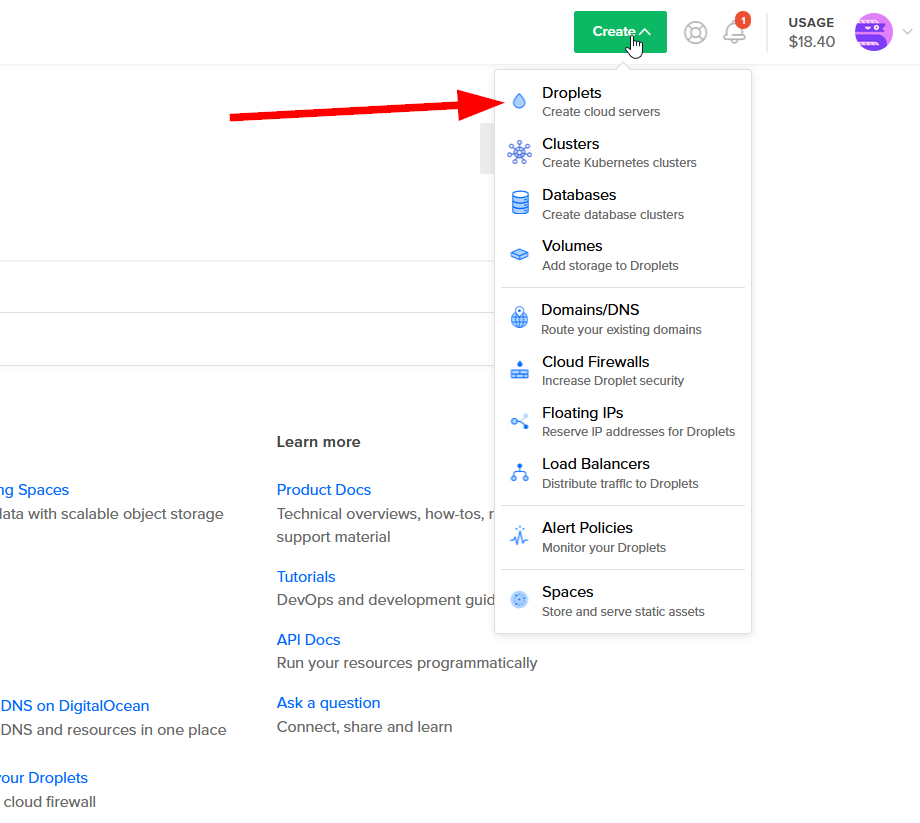
Once you’ve logged in to your DigitalOcean account, there should be a green button towards the top labeled “Create” that you can click. From the dropdown menu that appears, select “Droplets”
When selecting your operating system, select “CentOS” and pick 7.6 x64 as your version.
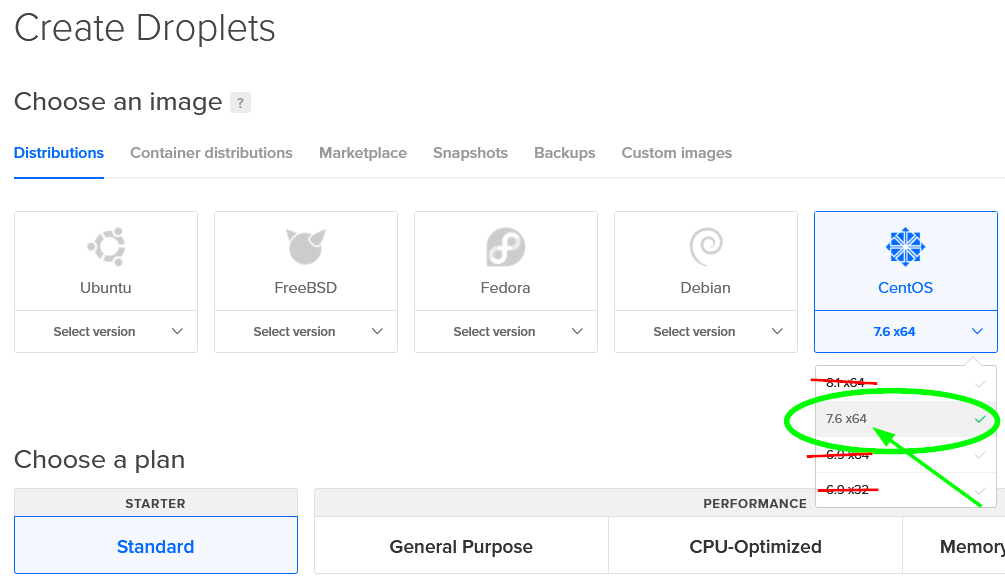
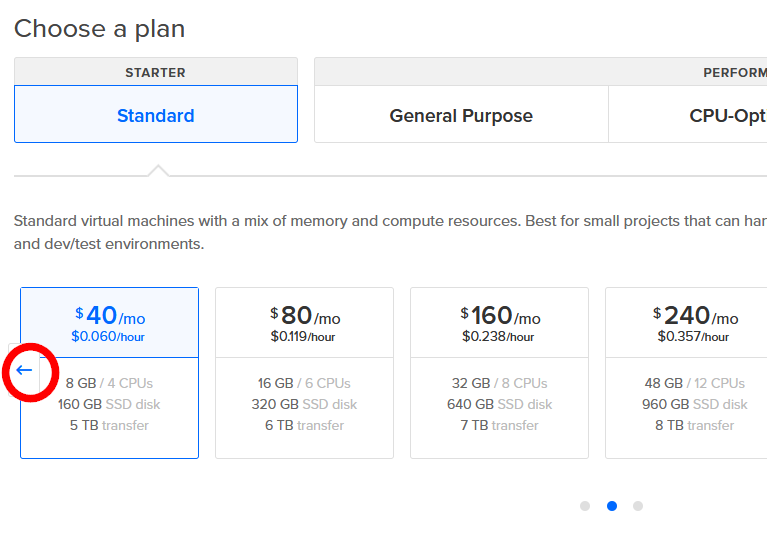
As far as what plan you want, if you’re interested in getting something cheaper than $40 a month, click on the right arrow under “Choose a plan”
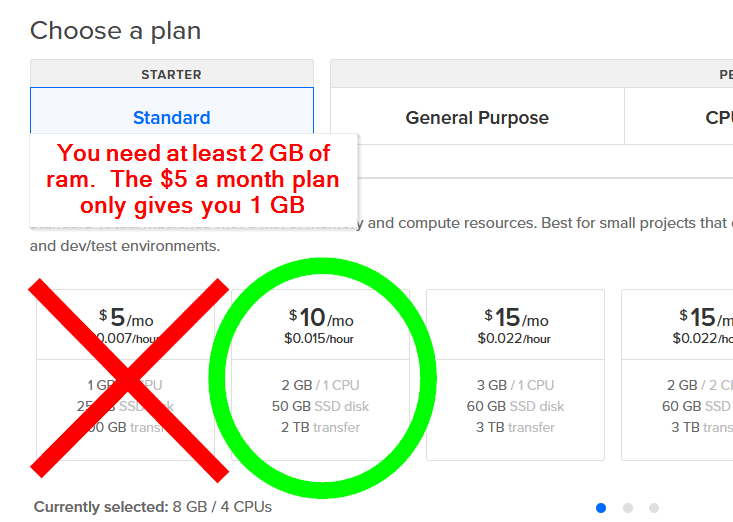
You might be tempted to go with the cheapest $5 a month plan, but the problem is you need at least 2 GB of RAM, and the $5 plan only offers 1 GB. I’m going to recommend you get the cheapest option for an Oracle install ($10 a month). You can always upgrade your machine later if you want.
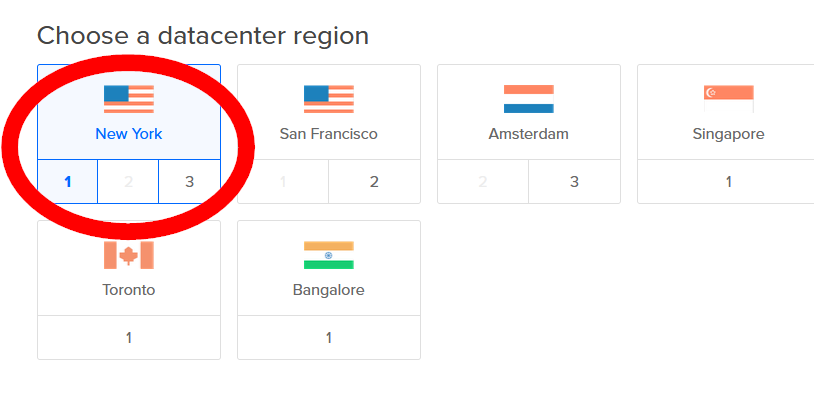
Under the next section, I’m going to recommend that you pick the datacenter region that’s closest to you so that you get the best upload speed/lowest latency. I’m going to pick New York.
As far as additional options goes, I’d recommend going ahead and selecting “monitoring”

Next, you’re going to want to generate a private and public key, if you haven’t already.
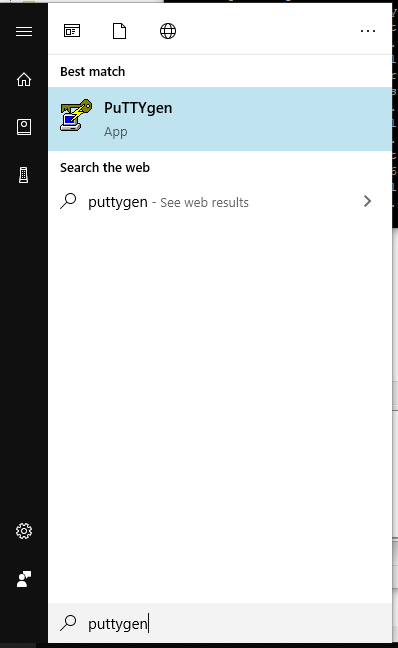
You may already be using PuTTY as an SSH client–specifically, there’s a tool that comes with PuTTY called puttygen that we’re interested. If you already have the PuTTY suite installed on your computer, you might already have puttygen installed (you can search for it in your windows start bar).
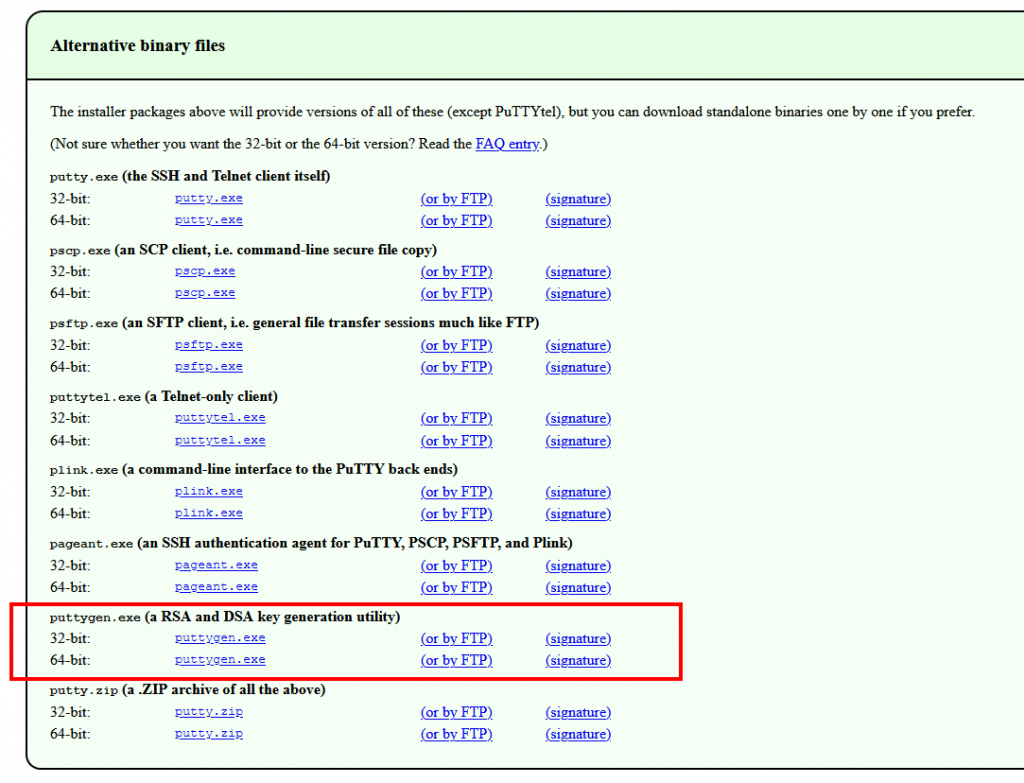
Otherwise you can download the standalone executable here:
https://www.chiark.greenend.org.uk/~sgtatham/putty/latest.html
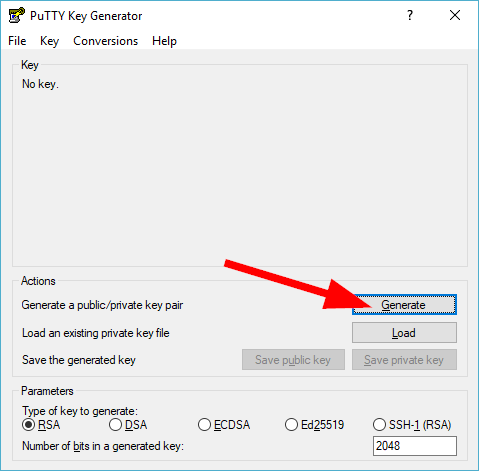
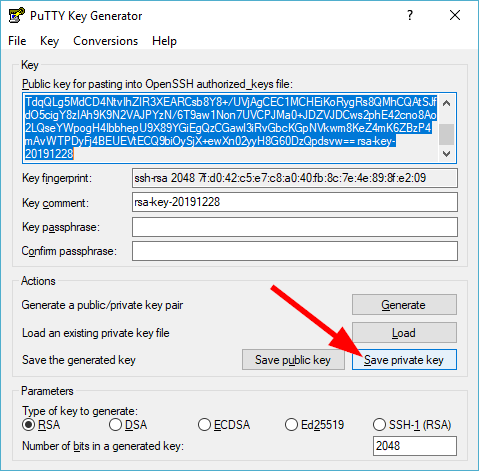
Launch puttygen. Make sure the “Type of Key to generate” is set to RSA, and the number of bits in a generated key is set to 2048.
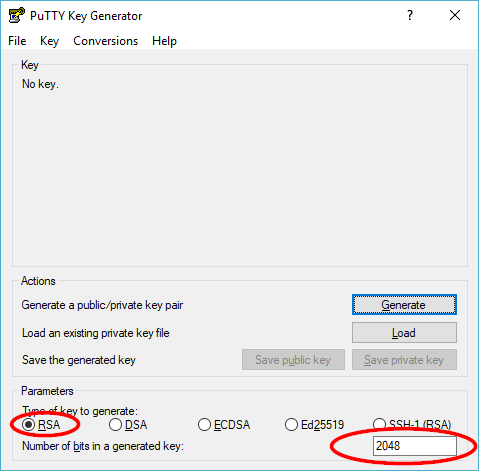
Next, click “Generate.”
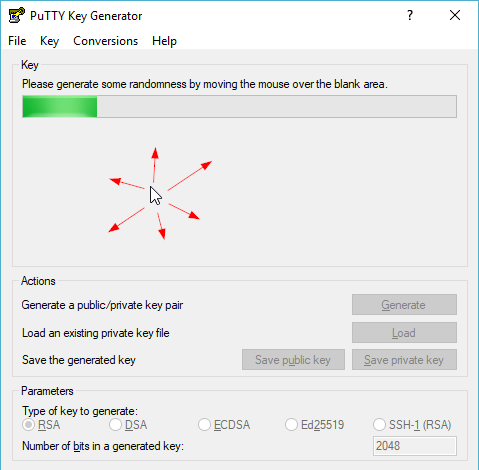
It’ll prompt you to wiggle your mouse over the window so that the key generator can use some random data when generating the key.
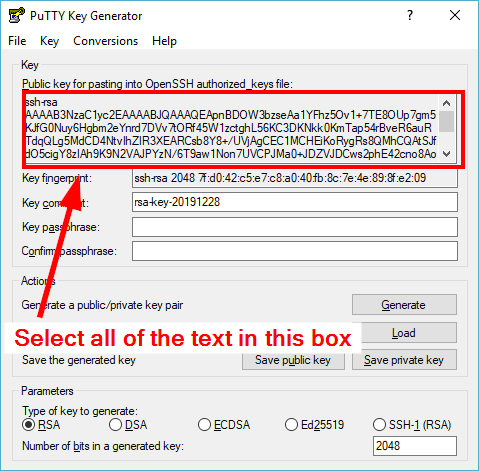
Puttygen will generate a public key and a private key that you can use to connect your box (without a password, if you want).
You want to select all of the text in your “public key” text box and copy it to your clipboard.

Back to the DigitalOcean page where you’re creating a droplet: Under the “Authentication” section, you can click “New SSH Key”
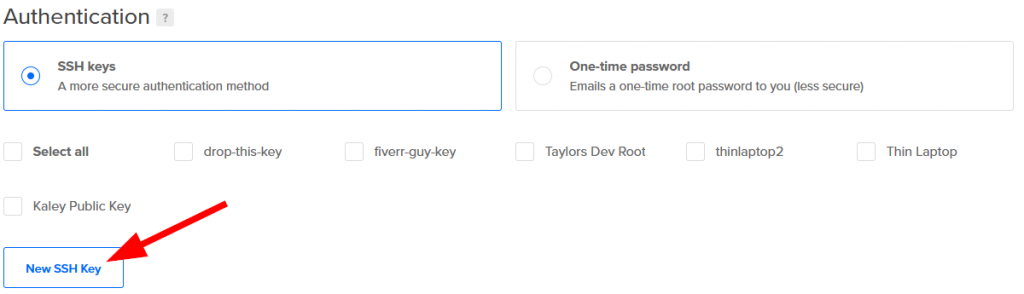
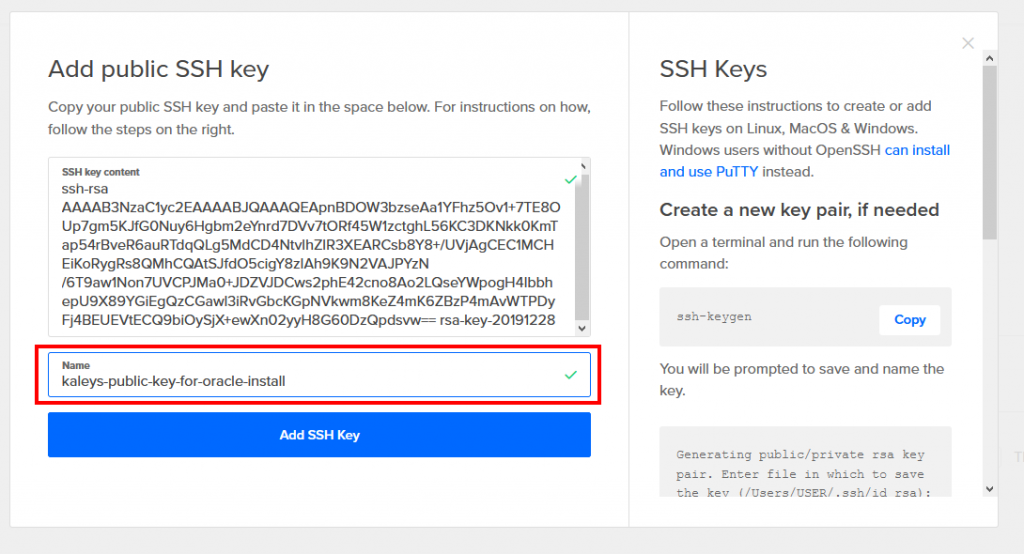
In the dialog box that appears, paste the key you copied to your clipboard.
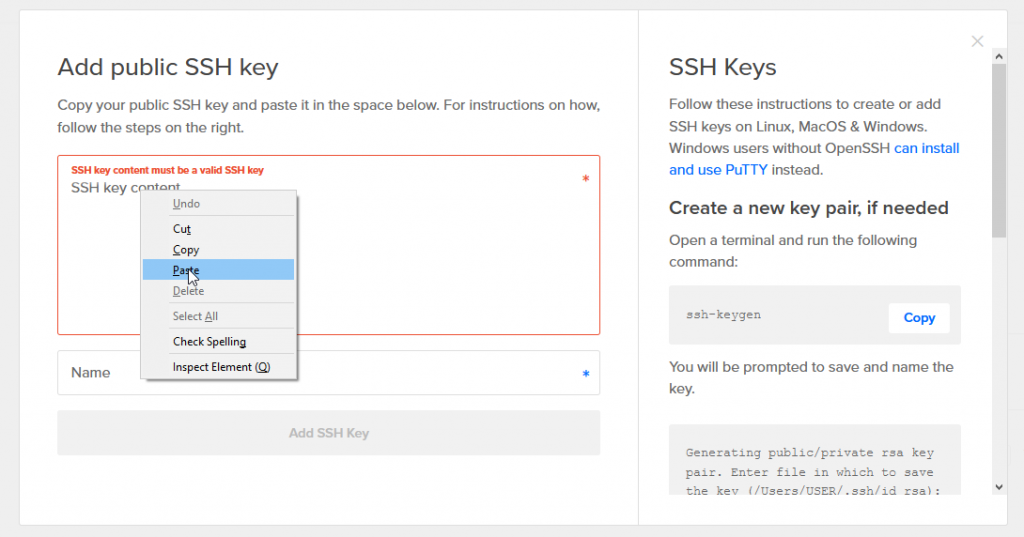
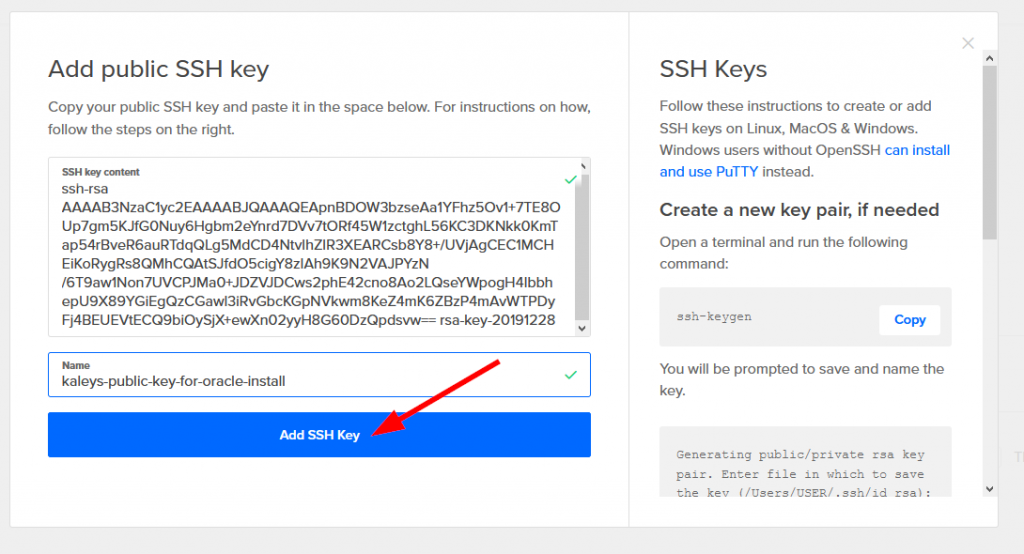
Once you’ve pasted your public key into the dialog box, give your key a name, and then select “Add SSH Key”
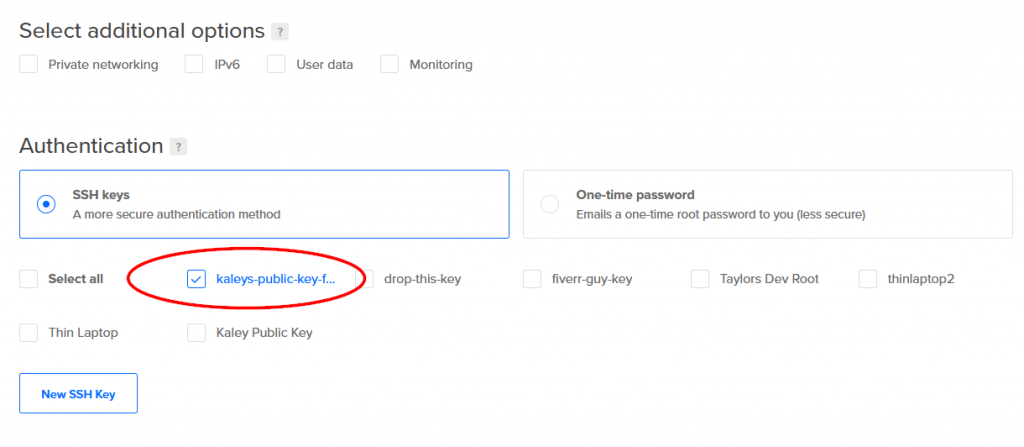
Your newly added public key should be selected.
Next, go back to your puttygen window and save the corresponding private key.
It may prompt you to add a passphrase to your key for added security. I’m going to choose not to have a passphrase: This is just a sandbox for me, and I’m not storing any critical data. So I’m going to select “Yes.”
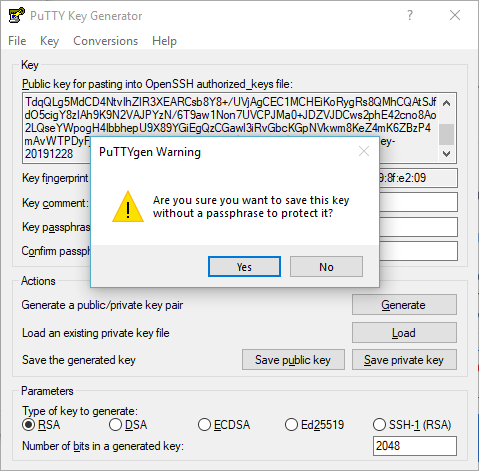
Otherwise, you may wish to add a password.
Give your private key a name, and remember where you put it.
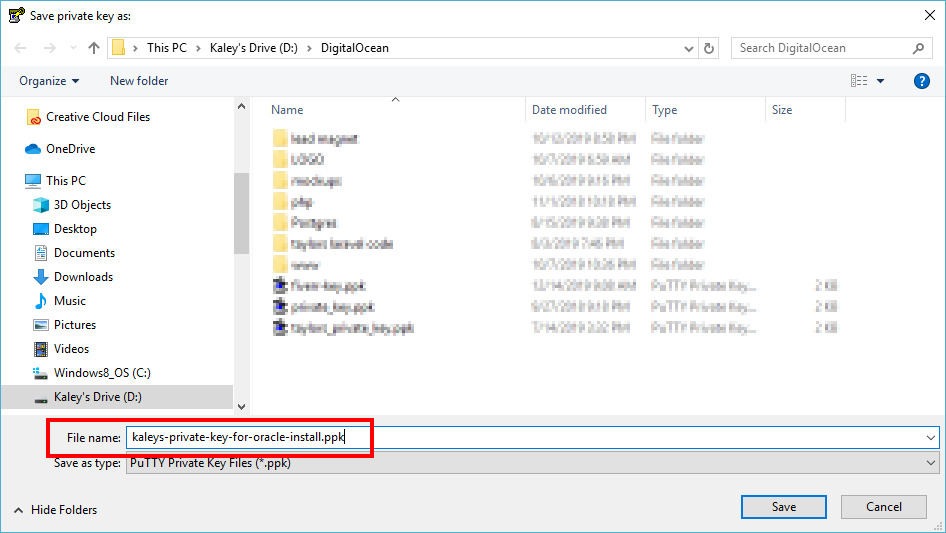
Remember where you saved the file and what you called it–you’ll need it later.
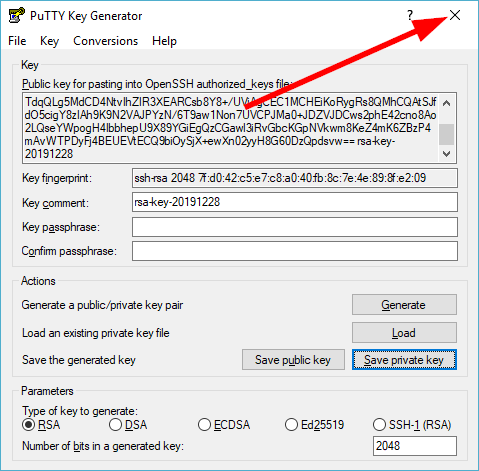
Once you’ve saved your private key, you’re done with PuTTY Key Generator. You can close it.
Back in your DigitalOcean browser page, under “Finalize and create” you probably only want 1 droplet selected. Also, I strongly recommend that you give your DigitalOcean droplet a more meaningful hostname than its default.
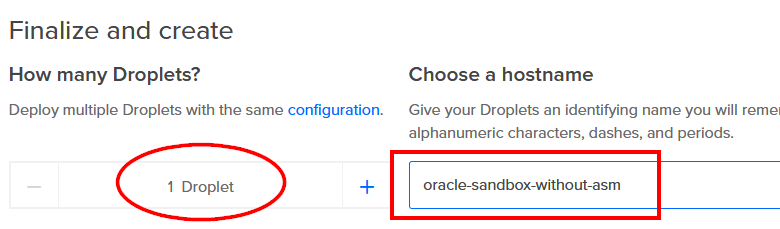
Choose a descriptive hostname: I strongly recommend you do NOT use the default hostname.
Optionally, you can add automatic weekly backups if you want (retained for 4 weeks). I’m not going to add backups because it adds $2.00 USD per month, but you can certainly add them if you want. (Price of backups dependent on the droplet size you get)

Alright! You’re ready to create your droplet!

Step 3 – Upload the .ZIP File to Your Droplet That You Downloaded From Oracle
Hopefully, by now, the .ZIP file you downloaded from Oracle has completed.
As soon as this download completes, you’ll want to start uploading the .ZIP file to your droplet. This is one of the most time-intensive steps, so this needs to be one of the first things we do with your droplet (we can work on other things while this file is being uploaded.
For this, I use FileZilla. You can use whatever FTP software you want for this, but FileZilla is free and works well.
You can download FileZilla here and install it:
https://filezilla-project.org/download.php
The install is pretty straightforward, so I wont’ cover that here.
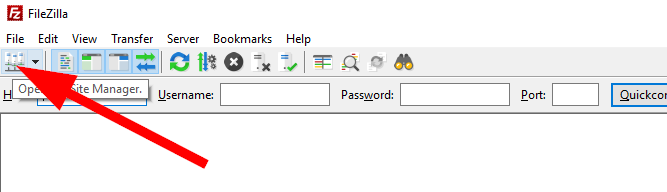
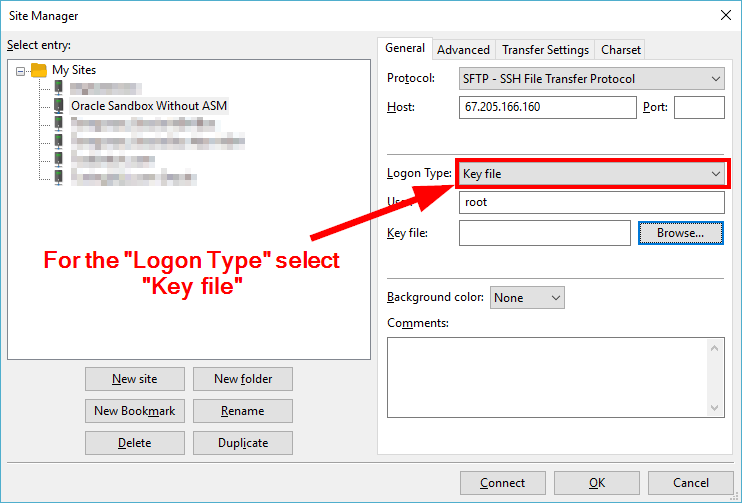
Once you get Filezilla open, you’ll want to click on the “Open the Site Manager” button in the toolbar at the top.
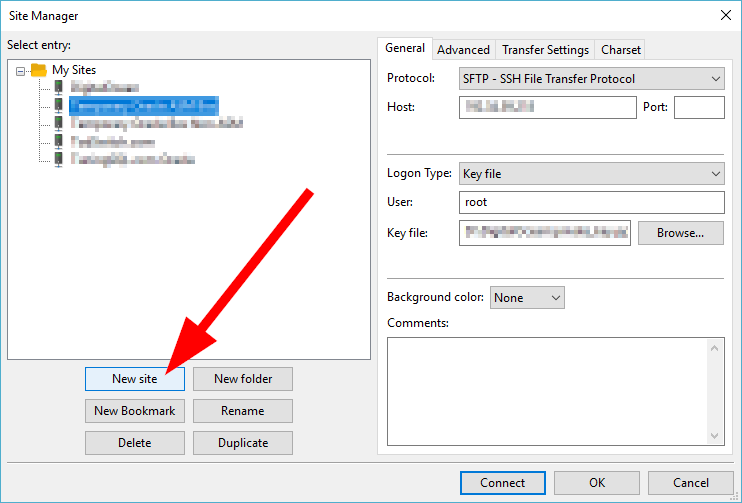
In the window that pops up, select “New site”
Go ahead and give your site a name:
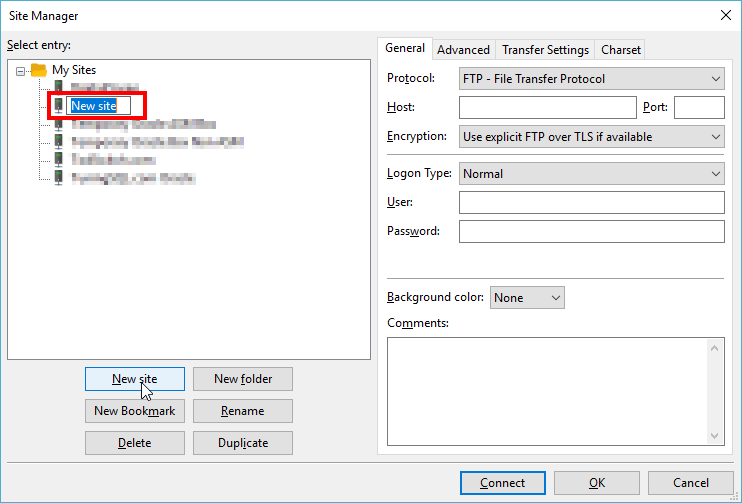
Next, go back to DigitalOcean and find the IP for your droplet.
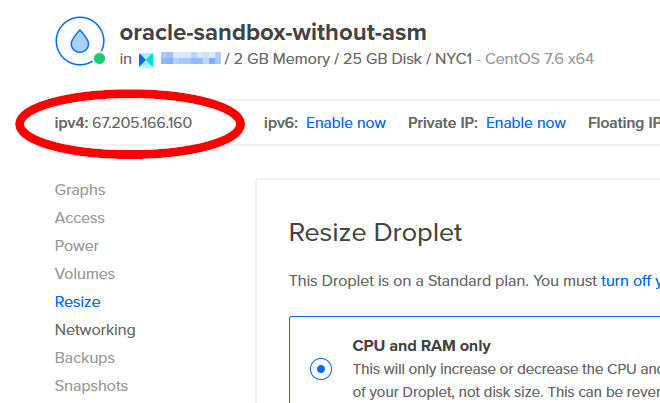
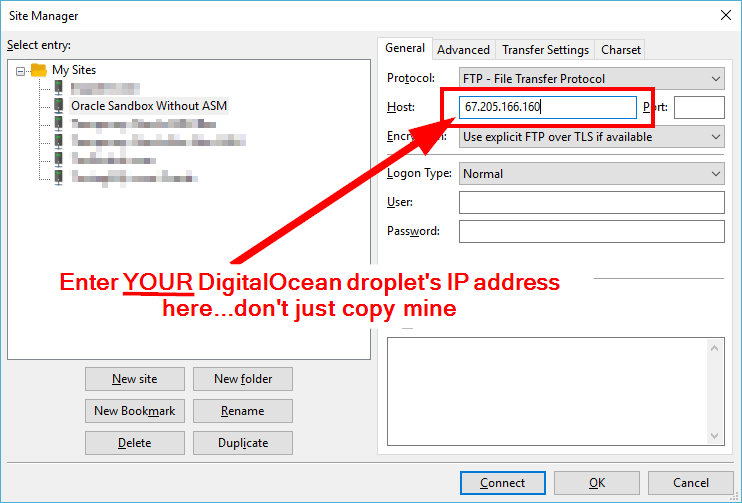
Enter your DigitalOcean droplet’s IP Address in the Host portion of FileZilla
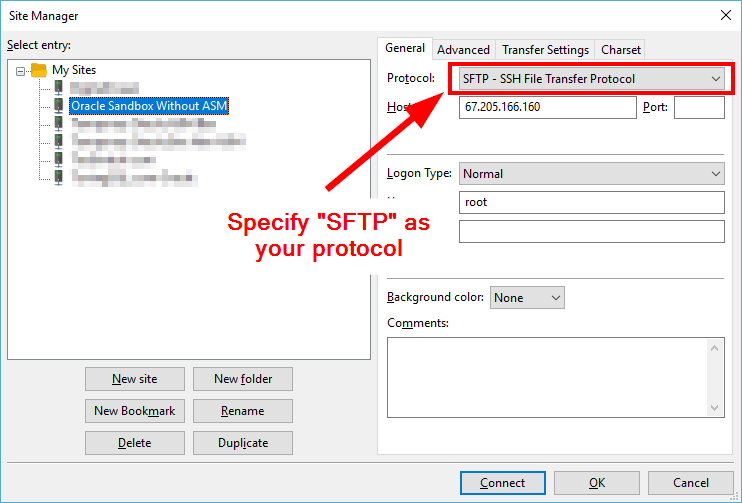
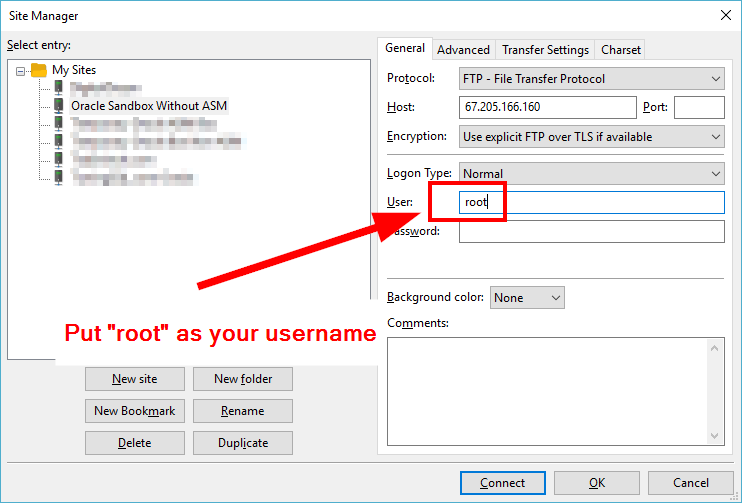
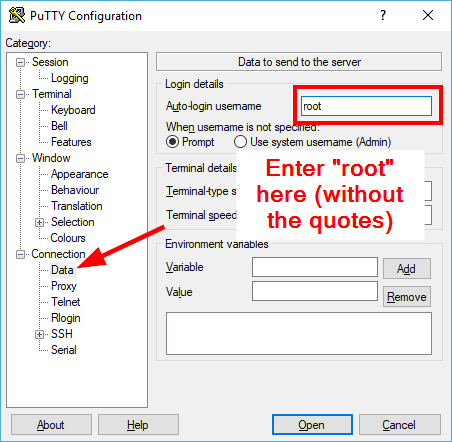
Put root as your username.
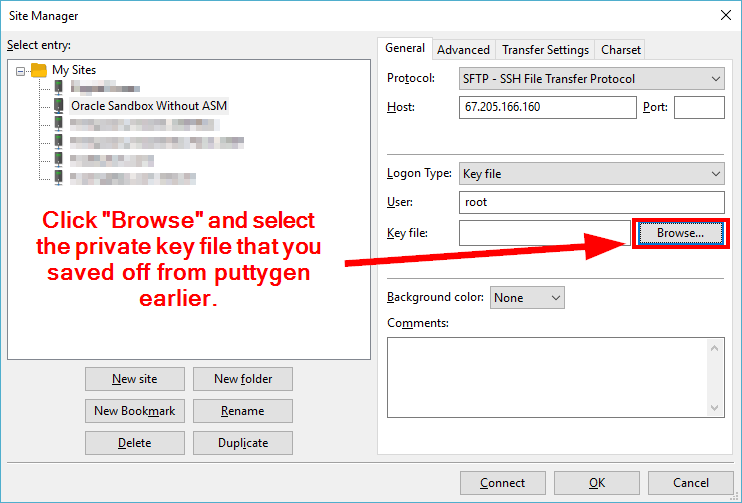
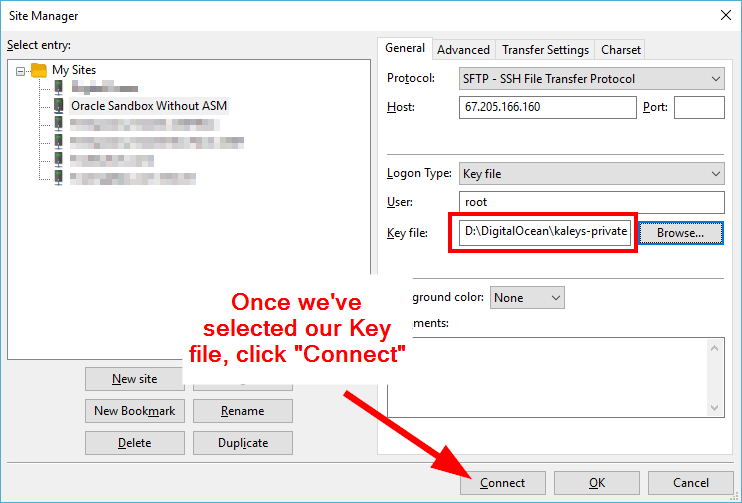
When you click “connect” you’ll get a prompt that says “Do you want to trust this host? I’d recommend clicking “Always trust this host, add this key to the cache” and select “Ok”
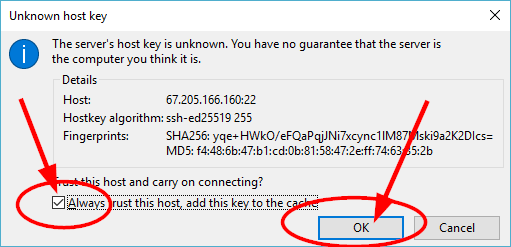
Once you’ve connected, you’ll probably be in the /root directory. Go ahead and upload the zip file from Oracle to this directory (or really, anywhere…you just need to make note of where it’s been uploaded).
We will change the location of this file later–the important thing is that we start loading it immediately, since it takes so long.
You can drag-and-drop the zip file into the directory listing window to get the upload started.
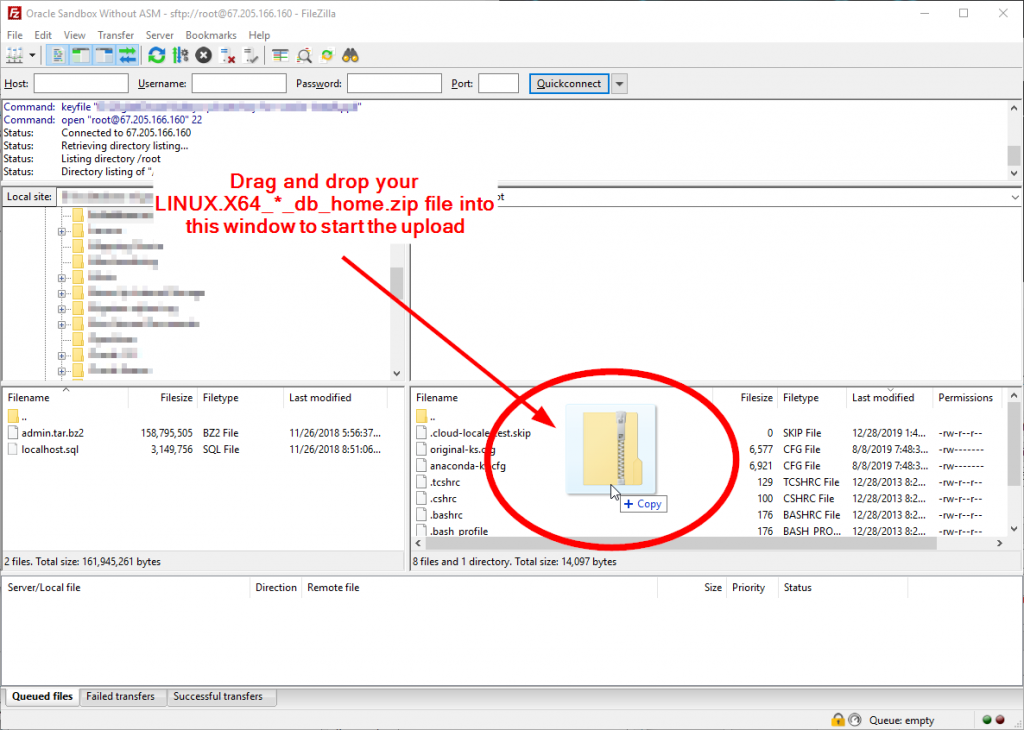
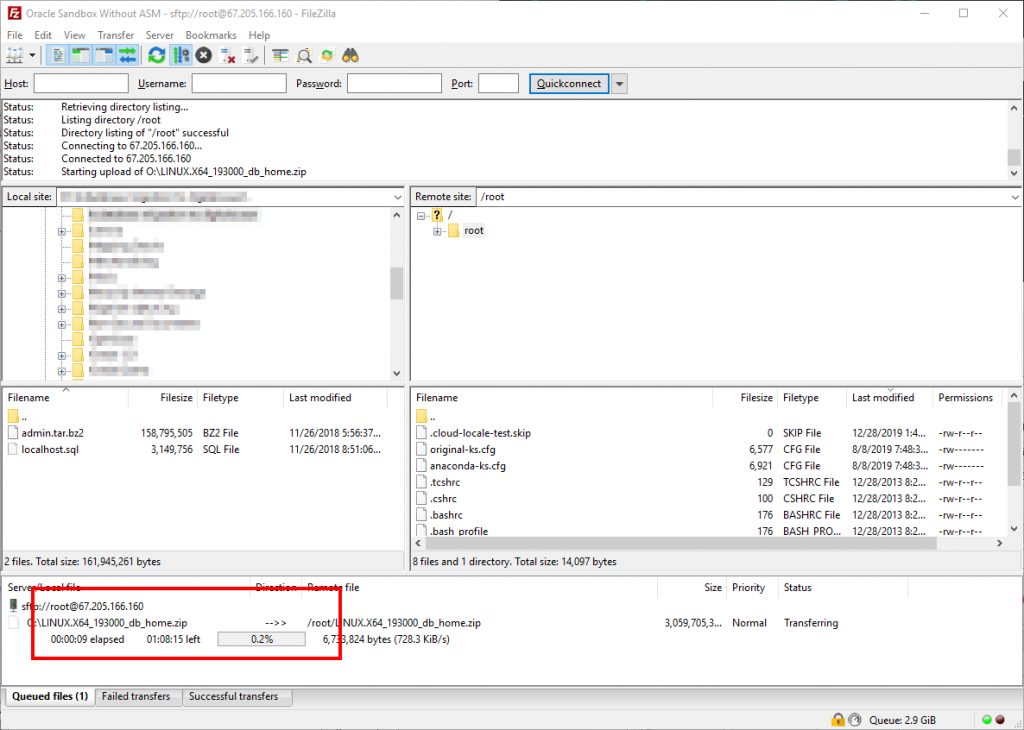
You’ll see the upload progress displayed in the bottom bar.
Step 4 – Configure PuTTY to Connect to Your Droplet
While that upload is going, we can configure PuTTY to connect to your DigitalOcean droplet.
Again, if you don’t have PuTTY installed on your system, you can get it from here:
https://www.chiark.greenend.org.uk/~sgtatham/putty/latest.html
You can either install it with the .msi installer, or download the standalone putty.exe
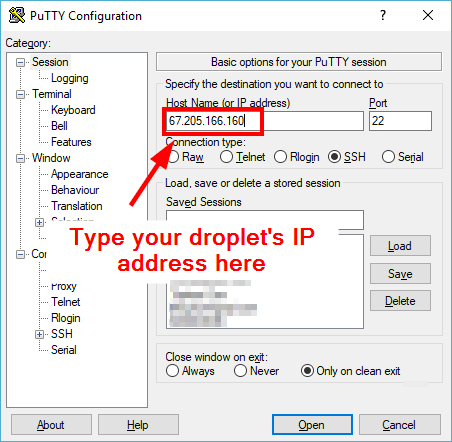
Once you have PuTTY open, for the host name, type your DigitalOcean droplet’s IP address in the Host Name box.
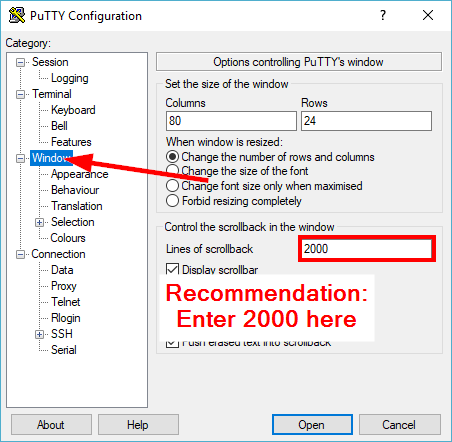
Next, I’m going to recommend you go to Window, and for “lines of scrollback,” I recommend that you change this to 2000.
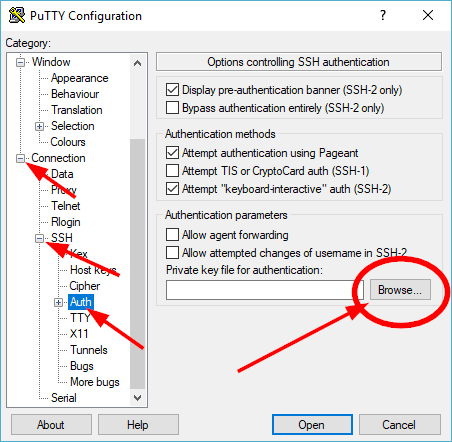
Under Connection -> SSH -> Auth, click “Browse” and find your private key file that you saved off earlier.
Next, click on Session. Under “Saved Sessions” give the session a name, and click “Save”
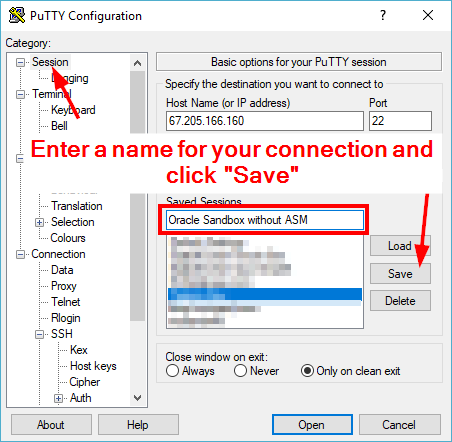
Next, click “Save”
Once you’ve saved the connection, it should appear in your list of “Saved Sessions” in the list below.
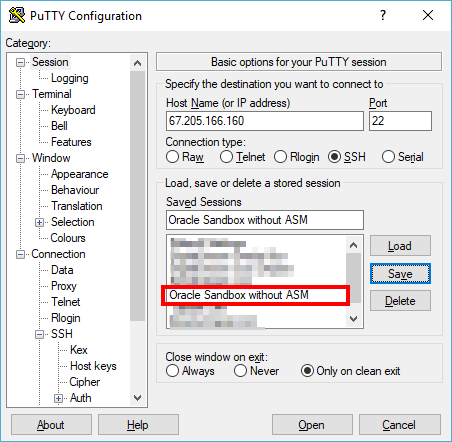
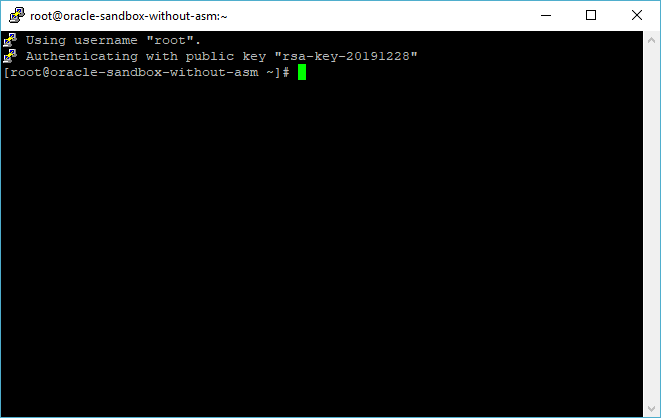
You can double-click on your session and it will open a PuTTY window.
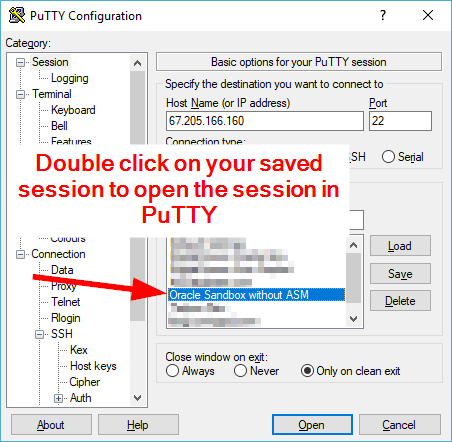
This should get you a PuTTY window open.
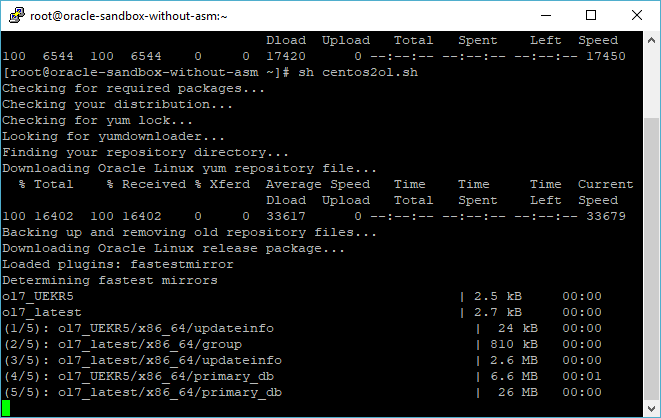
Step 5 – Convert CentOS to Oracle Linux
Copy this list of commands:
# Begin Step 5 - Convert CentOS to Oracle Linux
# The old link *was* here if you visited this tutorial in the past:
# https://linux.oracle.com/switch/centos2ol.sh
curl -O https://raw.githubusercontent.com/oracle/centos2ol/main/centos2ol.sh
chmod 700 centos2ol.sh
./centos2ol.sh
yum distro-sync -y
yum upgrade -y
# End Step 5 - Convert CentOS to Oracle Linux
Paste them into your PuTTY Session by just right-clicking on the Window
Step 6 – Disable SELINUX
Copy and paste the following commands into PuTTY
# Begin Step 6 - Disable SELINUX
sed -i 's/SELINUX=enforcing/SELINUX=disabled/' /etc/selinux/config
# End Step 6 - Disable SELINUX
Step 7 – Install Oracle Prerequisites
Copy and Paste the following commands into PuTTY
# Begin Step 7 - Oracle Prerequisite installation
yum install -y oracle-database-preinstall-19c
yum update -y
# End Step 7 - End Oracle Prerequisite installation
Step 8 – Create Directory Structure
Copy and Paste the following commands into PuTTY
# Begin Step 8 - Create Directory Structure
mkdir -p /u01/app/oracle/product/19.3.0/dbhome_1
mkdir -p /u01/oradata
chown -R oracle:oinstall /u01
chmod -R 775 /u01
# End Step 8 - Create Directory Structure
Step 9 – Add Environment Variables to Bash Profile
Copy and Past the following commands into PuTTY
# Begin Step 9 - Add Environment Variables to Bash Profile
su - oracle
cat >> .bash_profile <<EOF

# Oracle Settings
export TMP=/tmp
export TMPDIR=\$TMP
export ORACLE_HOSTNAME=`hostname`
export ORACLE_UNQNAME=ora19c
export ORACLE_BASE=/u01/app/oracle
export ORACLE_HOME=\$ORACLE_BASE/product/19.3.0/dbhome_1
export ORA_INVENTORY=/u01/app/oraInventory
export ORACLE_SID=ora19c
export PATH=/usr/sbin:/usr/local/bin:\$PATH
export PATH=\$ORACLE_HOME/bin:\$PATH
export LD_LIBRARY_PATH=\$ORACLE_HOME/lib:/lib:/usr/lib
export CLASSPATH=\$ORACLE_HOME/jlib:\$ORACLE_HOME/rdbms/jlib
EOF
exit
# End Step 9 - Add Environment Variables to Bash Profile
Step 10 – Add an Entry to /etc/hosts
Copy and past the following as root:
# Begin Step 10 - Add /etc/hosts entry
HOSTS_ENTRY=`ifconfig eth0 | grep 'inet ' | awk '{ print $2 }'`" "`hostname`
sed -i "0,/^$/ s/^\$/$HOSTS_ENTRY\n/" /etc/hosts
# End Step 10 - Add /etc/hosts entry
Step 11 – Move the Oracle .ZIP file to Oracle Home, Afterwards, Unzip
First of all, make sure that the LINUX.X64_*_db_home.zip file is finished uploading. If it’s not finished uploading, you’ll need to wait until it is.
Go check on your FileZilla session. Hopefully by now, you’ll see something like this:

If the install is not finished, you have to wait until you can proceed. Go do something else for a bit to distract yourself, and come back to these instructions later, as this can take awhile.
If the upload is finished, and if it’s been successfully transferred, then it’s showtime!
Go to the directory where you’ve uploaded the .ZIP file. If you’ve been following this tutorial verbatim, you’ve uploaded it to /root.
The first thing we want to do is make it so that Oracle owns the .ZIP file.
As root, change your current directory to /root (or wherever you uploaded the file)
cd /root
Next, change the owner of the .ZIP file to be oracle, and the group to be oinstall. Notice that if you’re using a different version of Oracle than me, your .ZIP file will have a different name. But here is the command I’m using:
chown oracle:oinstall LINUX.X64_193000_db_home.zip
Next, move the .ZIP file to the Oracle Home directory. Again, your .ZIP file may have a different file name than mine, but here’s the command I’m using:
mv LINUX.X64_193000_db_home.zip /u01/app/oracle/product/19.3.0/dbhome_1/
Now, become the Oracle user and navigate to the ORACLE_HOME directory.
su - oracle
cd $ORACLE_HOME
Unzip the zip file. Here’s the command I’m using, but again, if your zip file is named differently, your command will be different.
unzip -oq LINUX.X64_*_db_home.zip
Unzipping the file will take a minute.
Once the file has been successfully unzipped, I recommend that you DON’T delete the zip file yet (we’ll delete it at the end to free up that disk space) but if something goes wrong, you’ll have to re-upload the file all over again if you want to wipe out ORACLE_HOME and start again.
Step 12 – Install Response File
As the oracle user, copy the following command into your PuTTY session:
# Begin Step 12 - Install Response File
cat > /u01/app/oracle/product/19.3.0/dbhome_1/install/response/db_install.rsp <<EOF
####################################################################
## Copyright(c) Oracle Corporation 1998,2019. All rights reserved.##
##                                                                ##
## Specify values for the variables listed below to customize     ##
## your installation.                                             ##
##                                                                ##
## Each variable is associated with a comment. The comment        ##
## can help to populate the variables with the appropriate        ##
## values.                                                        ##
##                                                                ##
## IMPORTANT NOTE: This file contains plain text passwords and    ##
## should be secured to have read permission only by oracle user  ##
## or db administrator who owns this installation.                ##
##                                                                ##
####################################################################


#------------------------------------------------------------------------------
# Do not change the following system generated value.
#------------------------------------------------------------------------------
oracle.install.responseFileVersion=/oracle/install/rspfmt_dbinstall_response_schema_v19.0.0

#-------------------------------------------------------------------------------
# Specify the installation option.
# It can be one of the following:
#   - INSTALL_DB_SWONLY
#   - INSTALL_DB_AND_CONFIG
#-------------------------------------------------------------------------------
oracle.install.option=INSTALL_DB_SWONLY

#-------------------------------------------------------------------------------
# Specify the Unix group to be set for the inventory directory.
#-------------------------------------------------------------------------------
UNIX_GROUP_NAME=oinstall

#-------------------------------------------------------------------------------
# Specify the location which holds the inventory files.
# This is an optional parameter if installing on
# Windows based Operating System.
#-------------------------------------------------------------------------------
INVENTORY_LOCATION=/u01/app/oraInventory
#-------------------------------------------------------------------------------
# Specify the complete path of the Oracle Home.
#-------------------------------------------------------------------------------
ORACLE_HOME=/u01/app/oracle/product/19.3.0/dbhome_1

#-------------------------------------------------------------------------------
# Specify the complete path of the Oracle Base.
#-------------------------------------------------------------------------------
ORACLE_BASE=/u01/app/oracle

#-------------------------------------------------------------------------------
# Specify the installation edition of the component.
#
# The value should contain only one of these choices.
#   - EE     : Enterprise Edition
#   - SE2     : Standard Edition 2


#-------------------------------------------------------------------------------

oracle.install.db.InstallEdition=EE
###############################################################################
#                                                                             #
# PRIVILEGED OPERATING SYSTEM GROUPS                                          #
# ------------------------------------------                                  #
# Provide values for the OS groups to which SYSDBA and SYSOPER privileges     #
# needs to be granted. If the install is being performed as a member of the   #
# group "dba", then that will be used unless specified otherwise below.       #
#                                                                             #
# The value to be specified for OSDBA and OSOPER group is only for UNIX based #
# Operating System.                                                           #
#                                                                             #
###############################################################################

#------------------------------------------------------------------------------
# The OSDBA_GROUP is the OS group which is to be granted SYSDBA privileges.
#-------------------------------------------------------------------------------
oracle.install.db.OSDBA_GROUP=dba

#------------------------------------------------------------------------------
# The OSOPER_GROUP is the OS group which is to be granted SYSOPER privileges.
# The value to be specified for OSOPER group is optional.
#------------------------------------------------------------------------------
oracle.install.db.OSOPER_GROUP=oper

#------------------------------------------------------------------------------
# The OSBACKUPDBA_GROUP is the OS group which is to be granted SYSBACKUP privileges.
#------------------------------------------------------------------------------
oracle.install.db.OSBACKUPDBA_GROUP=backupdba

#------------------------------------------------------------------------------
# The OSDGDBA_GROUP is the OS group which is to be granted SYSDG privileges.
#------------------------------------------------------------------------------
oracle.install.db.OSDGDBA_GROUP=dgdba

#------------------------------------------------------------------------------
# The OSKMDBA_GROUP is the OS group which is to be granted SYSKM privileges.
#------------------------------------------------------------------------------
oracle.install.db.OSKMDBA_GROUP=kmdba

#------------------------------------------------------------------------------
# The OSRACDBA_GROUP is the OS group which is to be granted SYSRAC privileges.
#------------------------------------------------------------------------------
oracle.install.db.OSRACDBA_GROUP=racdba
################################################################################
#                                                                              #
#                      Root script execution configuration                     #
#                                                                              #
################################################################################

#-------------------------------------------------------------------------------------------------------
# Specify the root script execution mode.
#
#   - true  : To execute the root script automatically by using the appropriate configuration methods.
#   - false : To execute the root script manually.
#
# If this option is selected, password should be specified on the console.
#-------------------------------------------------------------------------------------------------------
oracle.install.db.rootconfig.executeRootScript=

#--------------------------------------------------------------------------------------
# Specify the configuration method to be used for automatic root script execution.
#
# Following are the possible choices:
#   - ROOT
#   - SUDO
#--------------------------------------------------------------------------------------
oracle.install.db.rootconfig.configMethod=
#--------------------------------------------------------------------------------------
# Specify the absolute path of the sudo program.
#
# Applicable only when SUDO configuration method was chosen.
#--------------------------------------------------------------------------------------
oracle.install.db.rootconfig.sudoPath=

#--------------------------------------------------------------------------------------
# Specify the name of the user who is in the sudoers list.
# Applicable only when SUDO configuration method was chosen.
# Note:For Single Instance database installations,the sudo user name must be the username of the user installing the database.
#--------------------------------------------------------------------------------------
oracle.install.db.rootconfig.sudoUserName=

###############################################################################
#                                                                             #
#                               Grid Options                                  #
#                                                                             #
###############################################################################

#------------------------------------------------------------------------------
# Value is required only if the specified install option is INSTALL_DB_SWONLY
#
# Specify the cluster node names selected during the installation.
#
# Example : oracle.install.db.CLUSTER_NODES=node1,node2
#------------------------------------------------------------------------------
oracle.install.db.CLUSTER_NODES=

###############################################################################
#                                                                             #
#                        Database Configuration Options                       #
#                                                                             #
###############################################################################

#-------------------------------------------------------------------------------
# Specify the type of database to create.
# It can be one of the following:
#   - GENERAL_PURPOSE
#   - DATA_WAREHOUSE
# GENERAL_PURPOSE: A starter database designed for general purpose use or transaction-heavy applications.
# DATA_WAREHOUSE : A starter database optimized for data warehousing applications.
#-------------------------------------------------------------------------------
oracle.install.db.config.starterdb.type=

#-------------------------------------------------------------------------------
# Specify the Starter Database Global Database Name.
#-------------------------------------------------------------------------------
oracle.install.db.config.starterdb.globalDBName=

#-------------------------------------------------------------------------------
# Specify the Starter Database SID.
#-------------------------------------------------------------------------------
oracle.install.db.config.starterdb.SID=

#-------------------------------------------------------------------------------
# Specify whether the database should be configured as a Container database.
# The value can be either "true" or "false". If left blank it will be assumed
# to be "false".
#-------------------------------------------------------------------------------
oracle.install.db.ConfigureAsContainerDB=

#-------------------------------------------------------------------------------
# Specify the  Pluggable Database name for the pluggable database in Container Database.
#-------------------------------------------------------------------------------
oracle.install.db.config.PDBName=

#-------------------------------------------------------------------------------
# Specify the Starter Database character set.
#
#  One of the following
#  AL32UTF8, WE8ISO8859P15, WE8MSWIN1252, EE8ISO8859P2,
#  EE8MSWIN1250, NE8ISO8859P10, NEE8ISO8859P4, BLT8MSWIN1257,
#  BLT8ISO8859P13, CL8ISO8859P5, CL8MSWIN1251, AR8ISO8859P6,
#  AR8MSWIN1256, EL8ISO8859P7, EL8MSWIN1253, IW8ISO8859P8,
#  IW8MSWIN1255, JA16EUC, JA16EUCTILDE, JA16SJIS, JA16SJISTILDE,
#  KO16MSWIN949, ZHS16GBK, TH8TISASCII, ZHT32EUC, ZHT16MSWIN950,
#  ZHT16HKSCS, WE8ISO8859P9, TR8MSWIN1254, VN8MSWIN1258
#-------------------------------------------------------------------------------
oracle.install.db.config.starterdb.characterSet=

#------------------------------------------------------------------------------
# This variable should be set to true if Automatic Memory Management
# in Database is desired.
# If Automatic Memory Management is not desired, and memory allocation
# is to be done manually, then set it to false.
#------------------------------------------------------------------------------
oracle.install.db.config.starterdb.memoryOption=

#-------------------------------------------------------------------------------
# Specify the total memory allocation for the database. Value(in MB) should be
# at least 256 MB, and should not exceed the total physical memory available
# on the system.
# Example: oracle.install.db.config.starterdb.memoryLimit=512
#-------------------------------------------------------------------------------
oracle.install.db.config.starterdb.memoryLimit=

#-------------------------------------------------------------------------------
# This variable controls whether to load Example Schemas onto
# the starter database or not.
# The value can be either "true" or "false". If left blank it will be assumed
# to be "false".
#-------------------------------------------------------------------------------
oracle.install.db.config.starterdb.installExampleSchemas=

###############################################################################
#                                                                             #
# Passwords can be supplied for the following four schemas in the	      #
# starter database:      						      #
#   SYS                                                                       #
#   SYSTEM                                                                    #
#   DBSNMP (used by Enterprise Manager)                                       #
#                                                                             #
# Same password can be used for all accounts (not recommended) 		      #
# or different passwords for each account can be provided (recommended)       #
#                                                                             #
###############################################################################

#------------------------------------------------------------------------------
# This variable holds the password that is to be used for all schemas in the
# starter database.
#-------------------------------------------------------------------------------
oracle.install.db.config.starterdb.password.ALL=

#-------------------------------------------------------------------------------
# Specify the SYS password for the starter database.
#-------------------------------------------------------------------------------
oracle.install.db.config.starterdb.password.SYS=

#-------------------------------------------------------------------------------
# Specify the SYSTEM password for the starter database.
#-------------------------------------------------------------------------------
oracle.install.db.config.starterdb.password.SYSTEM=

#-------------------------------------------------------------------------------
# Specify the DBSNMP password for the starter database.
# Applicable only when oracle.install.db.config.starterdb.managementOption=CLOUD_CONTROL
#-------------------------------------------------------------------------------
oracle.install.db.config.starterdb.password.DBSNMP=

#-------------------------------------------------------------------------------
# Specify the PDBADMIN password required for creation of Pluggable Database in the Container Database.
#-------------------------------------------------------------------------------
oracle.install.db.config.starterdb.password.PDBADMIN=

#-------------------------------------------------------------------------------
# Specify the management option to use for managing the database.
# Options are:
# 1. CLOUD_CONTROL - If you want to manage your database with Enterprise Manager Cloud Control along with Database Express.
# 2. DEFAULT   -If you want to manage your database using the default Database Express option.
#-------------------------------------------------------------------------------
oracle.install.db.config.starterdb.managementOption=

#-------------------------------------------------------------------------------
# Specify the OMS host to connect to Cloud Control.
# Applicable only when oracle.install.db.config.starterdb.managementOption=CLOUD_CONTROL
#-------------------------------------------------------------------------------
oracle.install.db.config.starterdb.omsHost=

#-------------------------------------------------------------------------------
# Specify the OMS port to connect to Cloud Control.
# Applicable only when oracle.install.db.config.starterdb.managementOption=CLOUD_CONTROL
#-------------------------------------------------------------------------------
oracle.install.db.config.starterdb.omsPort=

#-------------------------------------------------------------------------------
# Specify the EM Admin user name to use to connect to Cloud Control.
# Applicable only when oracle.install.db.config.starterdb.managementOption=CLOUD_CONTROL
#-------------------------------------------------------------------------------
oracle.install.db.config.starterdb.emAdminUser=

#-------------------------------------------------------------------------------
# Specify the EM Admin password to use to connect to Cloud Control.
# Applicable only when oracle.install.db.config.starterdb.managementOption=CLOUD_CONTROL
#-------------------------------------------------------------------------------
oracle.install.db.config.starterdb.emAdminPassword=

###############################################################################
#                                                                             #
# SPECIFY RECOVERY OPTIONS                                 	              #
# ------------------------------------		                              #
# Recovery options for the database can be mentioned using the entries below  #
#                                                                             #
###############################################################################

#------------------------------------------------------------------------------
# This variable is to be set to false if database recovery is not required. Else
# this can be set to true.
#-------------------------------------------------------------------------------
oracle.install.db.config.starterdb.enableRecovery=

#-------------------------------------------------------------------------------
# Specify the type of storage to use for the database.
# It can be one of the following:
#   - FILE_SYSTEM_STORAGE
#   - ASM_STORAGE
#-------------------------------------------------------------------------------
oracle.install.db.config.starterdb.storageType=

#-------------------------------------------------------------------------------
# Specify the database file location which is a directory for datafiles, control
# files, redo logs.
#
# Applicable only when oracle.install.db.config.starterdb.storage=FILE_SYSTEM_STORAGE
#-------------------------------------------------------------------------------
oracle.install.db.config.starterdb.fileSystemStorage.dataLocation=

#-------------------------------------------------------------------------------
# Specify the recovery location.
#
# Applicable only when oracle.install.db.config.starterdb.storage=FILE_SYSTEM_STORAGE
#-------------------------------------------------------------------------------
oracle.install.db.config.starterdb.fileSystemStorage.recoveryLocation=

#-------------------------------------------------------------------------------
# Specify the existing ASM disk groups to be used for storage.
#
# Applicable only when oracle.install.db.config.starterdb.storageType=ASM_STORAGE
#-------------------------------------------------------------------------------
oracle.install.db.config.asm.diskGroup=

#-------------------------------------------------------------------------------
# Specify the password for ASMSNMP user of the ASM instance.
#
# Applicable only when oracle.install.db.config.starterdb.storage=ASM_STORAGE
#-------------------------------------------------------------------------------
oracle.install.db.config.asm.ASMSNMPPassword=

EOF
# End Step 12 - Install Response File
Step 13 – Run the Oracle Installer
As the oracle user, copy the following command into your PuTTY session:
# Begin Step 13 - Run Oracle Installer
/u01/app/oracle/product/19.3.0/dbhome_1/runInstaller -silent -responseFile /u01/app/oracle/product/19.3.0/dbhome_1/install/response/db_install.rsp
# End Step 13 - Run Oracle Installer
Step 14 – Run the Root Scripts
If you are currently the oracle user (which, if you’ve been following this tutorial verbatim, you will be) then you need to type exit to become root.
exit # this command will get you to be root again if you're currently oracle
Run the following commands as root:
# Begin Step 14 - Run Root Scripts
/u01/app/oraInventory/orainstRoot.sh
/u01/app/oracle/product/19.3.0/dbhome_1/root.sh
# End Step 14 - Run Root Scripts
Step 15 – Install Oracle Net Response File
Become the oracle user.
su - oracleAs the oracle user, copy and past the following command into your PuTTY session:
# Begin Step 15 - Install Oracle Net Response File
cat > /u01/app/oracle/product/19.3.0/dbhome_1/assistants/netca/netca.rsp <<EOF
######################################################################
## Copyright(c) 1998, 2018 Oracle Corporation. All rights reserved. ##
##                                                                  ##
## Specify values for the variables listed below to customize your  ##
## installation.                                                    ##
##                                                                  ##
## Each variable is associated with a comment. The comment          ##
## identifies the variable type.                                    ##
##                                                                  ##
## Please specify the values in the following format:               ##
##                                                                  ##
##         Type         Example                                     ##
##         String       "Sample Value"                              ##
##         Boolean      True or False                               ##
##         Number       1000                                        ##
##         StringList   {"String value 1","String Value 2"}         ##
##                                                                  ##
######################################################################
##                                                                  ##
## This sample response file causes the Oracle Net Configuration    ##
## Assistant (NetCA) to complete an Oracle Net configuration during ##
## a custom install of the Oracle12c server which is similar to     ##
## what would be created by the NetCA during typical Oracle12c      ##
## install. It also documents all of the NetCA response file        ##
## variables so you can create your own response file to configure  ##
## Oracle Net during an install the way you wish.                   ##
##                                                                  ##
######################################################################

[GENERAL]
RESPONSEFILE_VERSION="19.0"
CREATE_TYPE="CUSTOM"

#-------------------------------------------------------------------------------
# Name       : SHOW_GUI
# Datatype   : Boolean
# Description: This variable controls appearance/suppression of the NetCA GUI,
# Pre-req    : N/A
# Default    : TRUE
# Note:
# This must be set to false in order to run NetCA in silent mode.
# This is a substitute of "/silent" flag in the NetCA command line.
# The command line flag has precedence over the one in this response file.
# This feature is present since 10.1.0.3.
#-------------------------------------------------------------------------------
#SHOW_GUI=false

#-------------------------------------------------------------------------------
# Name       : LOG_FILE
# Datatype   : String
# Description: If present, NetCA will log output to this file in addition to the
#	       standard out.
# Pre-req    : N/A
# Default    : NONE
# Note:
# 	This is a substitute of "/log" in the NetCA command line.
# The command line argument has precedence over the one in this response file.
# This feature is present since 10.1.0.3.
#-------------------------------------------------------------------------------
#LOG_FILE=""$ORACLE_BASE/cfgtoollogs/netca/netca.log""

[oracle.net.ca]
#INSTALLED_COMPONENTS;StringList;list of installed components
# The possible values for installed components are:
# "net8","server","client","aso", "cman", "javavm"
INSTALLED_COMPONENTS={"server","net8","javavm"}

#INSTALL_TYPE;String;type of install
# The possible values for install type are:
# "typical","minimal" or "custom"
INSTALL_TYPE=""typical""

#LISTENER_NUMBER;Number;Number of Listeners
# A typical install sets one listener
LISTENER_NUMBER=1

#LISTENER_NAMES;StringList;list of listener names
# The values for listener are:
# "LISTENER","LISTENER1","LISTENER2","LISTENER3", ...
# A typical install sets only "LISTENER"
LISTENER_NAMES={"LISTENER"}

#LISTENER_PROTOCOLS;StringList;list of listener addresses (protocols and parameters separated by semicolons)
# The possible values for listener protocols are:
# "TCP;1521","TCPS;2484","NMP;ORAPIPE","IPC;IPCKEY","VI;1521"
# For multiple listeners, separate them with commas ex "TCP;1521","TCPS;2484"
# For multiple protocols in single listener, separate them with "&" ex  "TCP;1521&TCPS;2484"
# A typical install sets only "TCP;1521"
LISTENER_PROTOCOLS={"TCP;1521"}

#LISTENER_START;String;name of the listener to start, in double quotes
LISTENER_START=""LISTENER""

#NAMING_METHODS;StringList;list of naming methods
# The possible values for naming methods are:
# LDAP, TNSNAMES, ONAMES, HOSTNAME, NOVELL, NIS, DCE
# A typical install sets only: "TNSNAMES","ONAMES","HOSTNAMES"
# or "LDAP","TNSNAMES","ONAMES","HOSTNAMES" for LDAP
NAMING_METHODS={"TNSNAMES","ONAMES","HOSTNAME"}

#NOVELL_NAMECONTEXT;String;Novell Directory Service name context, in double quotes
# A typical install does not use this variable.
#NOVELL_NAMECONTEXT = ""NAMCONTEXT""

#SUN_METAMAP;String; SUN meta map, in double quotes
# A typical install does not use this variable.
#SUN_METAMAP = ""MAP""

#DCE_CELLNAME;String;DCE cell name, in double quotes
# A typical install does not use this variable.
#DCE_CELLNAME = ""CELL""

#NSN_NUMBER;Number;Number of NetService Names
# A typical install sets one net service name
NSN_NUMBER=1

#NSN_NAMES;StringList;list of Net Service names
# A typical install sets net service name to "EXTPROC_CONNECTION_DATA"
NSN_NAMES={"EXTPROC_CONNECTION_DATA"}

#NSN_SERVICE;StringList;Oracle12c database's service name
# A typical install sets Oracle12c database's service name to "PLSExtProc"
NSN_SERVICE={"PLSExtProc"}

#NSN_PROTOCOLS;StringList;list of coma separated strings of Net Service Name protocol parameters
# The possible values for net service name protocol parameters are:
# "TCP;HOSTNAME;1521","TCPS;HOSTNAME;2484","NMP;COMPUTERNAME;ORAPIPE","VI;HOSTNAME;1521","IPC;IPCKEY"
# A typical install sets parameters to "IPC;EXTPROC"
NSN_PROTOCOLS={"TCP;HOSTNAME;1521"}

#SERVICEUSERPASSWORD;String;Windows service user password
# If the oracle home is installed as secure user, supply the password
#SERVICEUSERPASSWORD=""svcpassword""

EOF
# End Step 15 - Install Oracle Net Response File
Step 16 – Configure Oracle Net
As the oracle user, copy and paste the following commands into your PuTTY session.
# Begin Step 16 - Configure Oracle Net
netca -silent -responseFile $ORACLE_HOME/assistants/netca/netca.rsp
lsnrctl status
# End Step 16 - Configure Oracle Net
Step 17 – Install Configuration Assistant Response File
As the oracle user, copy and past the following commands into your PuTTY session.
# Begin Step 17 - Install Configuration Assistant Response File
cat > /u01/app/oracle/product/19.3.0/dbhome_1/assistants/dbca/dbca.rsp <<EOF
##############################################################################
##                                                                          ##
##                            DBCA response file                            ##
##                            ------------------                            ##
## Copyright(c) Oracle Corporation 1998,2019. All rights reserved.         ##
##                                                                          ##
## Specify values for the variables listed below to customize 			    ##
## your installation.                                         			    ##
##                                                            			    ##
## Each variable is associated with a comment. The comment    			    ##
## can help to populate the variables with the appropriate   			    ##
## values.                                                  			    ##
##                                                               			##
## IMPORTANT NOTE: This file contains plain text passwords and   			##
## should be secured to have read permission only by oracle user 			##
## or db administrator who owns this installation.               			##
##############################################################################
#-------------------------------------------------------------------------------
# Do not change the following system generated value.
#-------------------------------------------------------------------------------
responseFileVersion=/oracle/assistants/rspfmt_dbca_response_schema_v19.0.0

#-----------------------------------------------------------------------------
# Name          : gdbName
# Datatype      : String
# Description   : Global database name of the database
# Valid values  : <db_name>.<db_domain> - when database domain isn't NULL
#                 <db_name>             - when database domain is NULL
# Default value : None
# Mandatory     : Yes
#-----------------------------------------------------------------------------
gdbName=ora19c

#-----------------------------------------------------------------------------
# Name          : sid
# Datatype      : String
# Description   : System identifier (SID) of the database
# Valid values  : Check Oracle19c Administrator's Guide
# Default value : <db_name> specified in GDBNAME
# Mandatory     : No
#-----------------------------------------------------------------------------
sid=ora19c

#-----------------------------------------------------------------------------
# Name          : databaseConfigType
# Datatype      : String
# Description   : database conf type as Single Instance, Real Application Cluster or Real Application Cluster One Nodes database
# Valid values  : SI\RAC\RACONENODE
# Default value : SI
# Mandatory     : No
#-----------------------------------------------------------------------------
databaseConfigType=

#-----------------------------------------------------------------------------
# Name          : RACOneNodeServiceName
# Datatype      : String
# Description   : Service is required by application to connect to RAC One
#		  Node Database
# Valid values  : Service Name
# Default value : None
# Mandatory     : No [required in case DATABASECONFTYPE is set to RACONENODE ]
#-----------------------------------------------------------------------------
RACOneNodeServiceName=

#-----------------------------------------------------------------------------
# Name          : policyManaged
# Datatype      : Boolean
# Description   : Set to true if Database is policy managed and
#		  set to false if  Database is admin managed
# Valid values  : TRUE\FALSE
# Default value : FALSE
# Mandatory     : No
#-----------------------------------------------------------------------------
policyManaged=


#-----------------------------------------------------------------------------
# Name          : createServerPool
# Datatype      : Boolean
# Description   : Set to true if new server pool need to be created for database
#		  if this option is specified then the newly created database
#		  will use this newly created serverpool.
#		  Multiple serverpoolname can not be specified for database
# Valid values  : TRUE\FALSE
# Default value : FALSE
# Mandatory     : No
#-----------------------------------------------------------------------------
createServerPool=

#-----------------------------------------------------------------------------
# Name          : serverPoolName
# Datatype      : String
# Description   : Only one serverpool name need to be specified
#		   if Create Server Pool option is specified.
#		   Comma-separated list of Serverpool names if db need to use
#		   multiple Server pool
# Valid values  : ServerPool name

# Default value : None
# Mandatory     : No [required in case of RAC service centric database]
#-----------------------------------------------------------------------------
serverPoolName=

#-----------------------------------------------------------------------------
# Name          : cardinality
# Datatype      : Number
# Description   : Specify Cardinality for create server pool operation

# Valid values  : any positive Integer value
# Default value : Number of qualified nodes on cluster
# Mandatory     : No [Required when a new serverpool need to be created]
#-----------------------------------------------------------------------------
cardinality=

#-----------------------------------------------------------------------------
# Name          : force
# Datatype      : Boolean
# Description   : Set to true if new server pool need to be created by force
#		  if this option is specified then the newly created serverpool
#		  will be assigned server even if no free servers are available.
#		  This may affect already running database.
#		  This flag can be specified for Admin managed as well as policy managed db.
# Valid values  : TRUE\FALSE
# Default value : FALSE
# Mandatory     : No
#-----------------------------------------------------------------------------
force=

#-----------------------------------------------------------------------------
# Name          : pqPoolName
# Datatype      : String
# Description   : Only one serverpool name needs to be specified
#		   if create server pool option is specified.
#		   Comma-separated list of serverpool names if use
#		   server pool. This is required to
#                  create Parallel Query (PQ) database. Applicable to Big Cluster
# Valid values  :  Parallel Query (PQ) pool name
# Default value : None
# Mandatory     : No [required in case of RAC service centric database]
#-----------------------------------------------------------------------------
pqPoolName=

#-----------------------------------------------------------------------------
# Name          : pqCardinality
# Datatype      : Number
# Description   : Specify Cardinality for create server pool operation.
#                 Applicable to Big Cluster
# Valid values  : any positive Integer value
# Default value : Number of qualified nodes on cluster
# Mandatory     : No [Required when a new serverpool need to be created]
#-----------------------------------------------------------------------------
pqCardinality=

#-----------------------------------------------------------------------------
# Name          : createAsContainerDatabase
# Datatype      : boolean
# Description   : flag to create database as container database
# Valid values  : Check Oracle19c Administrator's Guide
# Default value : false
# Mandatory     : No
#-----------------------------------------------------------------------------
createAsContainerDatabase=true

#-----------------------------------------------------------------------------
# Name          : numberOfPDBs
# Datatype      : Number
# Description   : Specify the number of pdb to be created
# Valid values  : 0 to 4094
# Default value : 0
# Mandatory     : No
#-----------------------------------------------------------------------------
numberOfPDBs=1

#-----------------------------------------------------------------------------
# Name          : pdbName
# Datatype      : String
# Description   : Specify the pdbname/pdbanme prefix if one or more pdb need to be created
# Valid values  : Check Oracle19c Administrator's Guide
# Default value : None
# Mandatory     : No
#-----------------------------------------------------------------------------
pdbName=pora19c1

#-----------------------------------------------------------------------------
# Name          : useLocalUndoForPDBs
# Datatype      : boolean
# Description   : Flag to create local undo tablespace for all PDB's.
# Valid values  : TRUE\FALSE
# Default value : TRUE
# Mandatory     : No
#-----------------------------------------------------------------------------
useLocalUndoForPDBs=true

#-----------------------------------------------------------------------------
# Name          : pdbAdminPassword
# Datatype      : String
# Description   : PDB Administrator user password
# Valid values  : Check Oracle19c Administrator's Guide
# Default value : None
# Mandatory     : No
#-----------------------------------------------------------------------------

pdbAdminPassword=Testora19c#

#-----------------------------------------------------------------------------
# Name          : nodelist
# Datatype      : String
# Description   : Comma-separated list of cluster nodes
# Valid values  : Cluster node names
# Default value : None
# Mandatory     : No (Yes for RAC database-centric database )
#-----------------------------------------------------------------------------
nodelist=

#-----------------------------------------------------------------------------
# Name          : templateName
# Datatype      : String
# Description   : Name of the template
# Valid values  : Template file name
# Default value : None
# Mandatory     : Yes
#-----------------------------------------------------------------------------
templateName=General_Purpose.dbc

#-----------------------------------------------------------------------------
# Name          : sysPassword
# Datatype      : String
# Description   : Password for SYS user
# Valid values  : Check Oracle19c Administrator's Guide
# Default value : None
# Mandatory     : Yes
#-----------------------------------------------------------------------------
sysPassword=Testora19c#

#-----------------------------------------------------------------------------
# Name          : systemPassword
# Datatype      : String
# Description   : Password for SYSTEM user
# Valid values  : Check Oracle19c Administrator's Guide
# Default value : None
# Mandatory     : Yes
#-----------------------------------------------------------------------------
systemPassword=Testora19c#

#-----------------------------------------------------------------------------
# Name          : oracleHomeUserPassword
# Datatype      : String
# Description   : Password for Windows Service user
# Default value : None
# Mandatory     : If Oracle home is installed with windows service user
#-----------------------------------------------------------------------------
oracleHomeUserPassword=

#-----------------------------------------------------------------------------
# Name          : emConfiguration
# Datatype      : String
# Description   : Enterprise Manager Configuration Type
# Valid values  : CENTRAL|DBEXPRESS|BOTH|NONE
# Default value : NONE
# Mandatory     : No
#-----------------------------------------------------------------------------
emConfiguration=DBEXPRESS

#-----------------------------------------------------------------------------
# Name          : emExpressPort
# Datatype      : Number
# Description   : Enterprise Manager Configuration Type
# Valid values  : Check Oracle19c Administrator's Guide
# Default value : NONE
# Mandatory     : No, will be picked up from DBEXPRESS_HTTPS_PORT env variable
#                 or auto generates a free port between 5500 and 5599
#-----------------------------------------------------------------------------
emExpressPort=5510

#-----------------------------------------------------------------------------
# Name          : runCVUChecks
# Datatype      : Boolean
# Description   : Specify whether to run Cluster Verification Utility checks
#                 periodically in Cluster environment
# Valid values  : TRUE\FALSE
# Default value : FALSE
# Mandatory     : No
#-----------------------------------------------------------------------------
runCVUChecks=

#-----------------------------------------------------------------------------
# Name          : dbsnmpPassword
# Datatype      : String
# Description   : Password for DBSNMP user
# Valid values  : Check Oracle19c Administrator's Guide
# Default value : None
# Mandatory     : Yes, if emConfiguration is specified or
#                 the value of runCVUChecks is TRUE
#-----------------------------------------------------------------------------
dbsnmpPassword=Testora19c#

#-----------------------------------------------------------------------------
# Name          : omsHost
# Datatype      : String
# Description   : EM management server host name
# Default value : None
# Mandatory     : Yes, if CENTRAL is specified for emConfiguration
#-----------------------------------------------------------------------------
omsHost=

#-----------------------------------------------------------------------------
# Name          : omsPort
# Datatype      : Number
# Description   : EM management server port number
# Default value : None
# Mandatory     : Yes, if CENTRAL is specified for emConfiguration
#-----------------------------------------------------------------------------
omsPort=

#-----------------------------------------------------------------------------
# Name          : emUser
# Datatype      : String
# Description   : EM Admin username to add or modify targets
# Default value : None
# Mandatory     : Yes, if CENTRAL is specified for emConfiguration
#-----------------------------------------------------------------------------
emUser=

#-----------------------------------------------------------------------------
# Name          : emPassword
# Datatype      : String
# Description   : EM Admin user password
# Default value : None
# Mandatory     : Yes, if CENTRAL is specified for emConfiguration
#-----------------------------------------------------------------------------
emPassword=

#-----------------------------------------------------------------------------
# Name          : dvConfiguration
# Datatype      : Boolean
# Description   : Specify "True" to configure and enable Oracle Database vault
# Valid values  : True/False
# Default value : False
# Mandatory     : No
#-----------------------------------------------------------------------------
dvConfiguration=

#-----------------------------------------------------------------------------
# Name          : dvUserName
# Datatype      : String
# Description   : DataVault Owner
# Valid values  : Check Oracle19c Administrator's Guide
# Default value : None
# Mandatory     : Yes, if DataVault option is chosen
#-----------------------------------------------------------------------------
dvUserName=

#-----------------------------------------------------------------------------
# Name          : dvUserPassword
# Datatype      : String
# Description   : Password for DataVault Owner
# Valid values  : Check Oracle19c Administrator's Guide
# Default value : None
# Mandatory     : Yes, if DataVault option is chosen
#-----------------------------------------------------------------------------
dvUserPassword=

#-----------------------------------------------------------------------------
# Name          : dvAccountManagerName
# Datatype      : String
# Description   : DataVault Account Manager
# Valid values  : Check Oracle19c Administrator's Guide
# Default value : None
# Mandatory     : No
#-----------------------------------------------------------------------------
dvAccountManagerName=

#-----------------------------------------------------------------------------
# Name          : dvAccountManagerPassword
# Datatype      : String
# Description   : Password for  DataVault Account Manager
# Valid values  : Check Oracle19c Administrator's Guide
# Default value : None
# Mandatory     : No
#-----------------------------------------------------------------------------
dvAccountManagerPassword=

#-----------------------------------------------------------------------------
# Name          : olsConfiguration
# Datatype      : Boolean
# Description   : Specify "True" to configure and enable Oracle Label Security
# Valid values  : True/False
# Default value : False
# Mandatory     : No
#-----------------------------------------------------------------------------
olsConfiguration=

#-----------------------------------------------------------------------------
# Name          : datafileJarLocation
# Datatype      : String
# Description   : Location of the data file jar
# Valid values  : Directory containing compressed datafile jar
# Default value : None
# Mandatory     : No
#-----------------------------------------------------------------------------
datafileJarLocation=

#-----------------------------------------------------------------------------
# Name          : datafileDestination
# Datatype      : String
# Description   : Location of the data file's
# Valid values  : Directory for all the database files
# Default value : \$ORACLE_BASE/oradata
# Mandatory     : No
#-----------------------------------------------------------------------------
datafileDestination=/u01/app/oracle/oradata

#-----------------------------------------------------------------------------
# Name          : recoveryAreaDestination
# Datatype      : String
# Description   : Location of the data file's
# Valid values  : Recovery Area location
# Default value : \$ORACLE_BASE/flash_recovery_area
# Mandatory     : No
#-----------------------------------------------------------------------------
recoveryAreaDestination=/u01/app/oracle/flash_recovery_area

#-----------------------------------------------------------------------------
# Name          : storageType
# Datatype      : String
# Description   : Specifies the storage on which the database is to be created
# Valid values  : FS (CFS for RAC), ASM
# Default value : FS
# Mandatory     : No
#-----------------------------------------------------------------------------
storageType=FS

#-----------------------------------------------------------------------------
# Name          : diskGroupName
# Datatype      : String
# Description   : Specifies the disk group name for the storage
# Default value : DATA
# Mandatory     : No
#-----------------------------------------------------------------------------
diskGroupName=

#-----------------------------------------------------------------------------
# Name          : asmsnmpPassword
# Datatype      : String
# Description   : Password for ASM Monitoring
# Default value : None
# Mandatory     : No
#-----------------------------------------------------------------------------
asmsnmpPassword=

#-----------------------------------------------------------------------------
# Name          : recoveryGroupName
# Datatype      : String
# Description   : Specifies the disk group name for the recovery area
# Default value : RECOVERY
# Mandatory     : No
#-----------------------------------------------------------------------------
recoveryGroupName=

#-----------------------------------------------------------------------------
# Name          : characterSet
# Datatype      : String
# Description   : Character set of the database
# Valid values  : Check Oracle19c National Language Support Guide
# Default value : "US7ASCII"
# Mandatory     : NO
#-----------------------------------------------------------------------------
characterSet=AL32UTF8

#-----------------------------------------------------------------------------
# Name          : nationalCharacterSet
# Datatype      : String
# Description   : National Character set of the database
# Valid values  : "UTF8" or "AL16UTF16". For details, check Oracle19c National Language Support Guide
# Default value : "AL16UTF16"
# Mandatory     : No
#-----------------------------------------------------------------------------
nationalCharacterSet=AL16UTF16

#-----------------------------------------------------------------------------
# Name          : registerWithDirService
# Datatype      : Boolean
# Description   : Specifies whether to register with Directory Service.
# Valid values  : TRUE \ FALSE
# Default value : FALSE
# Mandatory     : No
#-----------------------------------------------------------------------------
registerWithDirService=


#-----------------------------------------------------------------------------
# Name          : dirServiceUserName
# Datatype      : String
# Description   : Specifies the name of the directory service user
# Mandatory     : YES, if the value of registerWithDirService is TRUE
#-----------------------------------------------------------------------------
dirServiceUserName=

#-----------------------------------------------------------------------------
# Name          : dirServicePassword
# Datatype      : String
# Description   : The password of the directory service user.
#		  You can also specify the password at the command prompt instead of here.
# Mandatory     : YES, if the value of registerWithDirService is TRUE
#-----------------------------------------------------------------------------
dirServicePassword=

#-----------------------------------------------------------------------------
# Name          : walletPassword
# Datatype      : String
# Description   : The password for wallet to created or modified.
#		  You can also specify the password at the command prompt instead of here.
# Mandatory     : YES, if the value of registerWithDirService is TRUE
#-----------------------------------------------------------------------------
walletPassword=

#-----------------------------------------------------------------------------
# Name          : listeners
# Datatype      : String
# Description   : Specifies list of listeners to register the database with.
#		  By default the database is configured for all the listeners specified in the
#		  \$ORACLE_HOME/network/admin/listener.ora
# Valid values  : The list should be comma separated like "listener1,listener2".
# Mandatory     : NO
#-----------------------------------------------------------------------------
listeners=LISTENER

#-----------------------------------------------------------------------------
# Name          : variablesFile
# Datatype      : String
# Description   : Location of the file containing variable value pair
# Valid values  : A valid file-system file. The variable value pair format in this file
#		  is <variable>=<value>. Each pair should be in a new line.
# Default value : None
# Mandatory     : NO
#-----------------------------------------------------------------------------
variablesFile=

#-----------------------------------------------------------------------------
# Name          : variables
# Datatype      : String
# Description   : comma separated list of name=value pairs. Overrides variables defined in variablefile and templates
# Default value : None
# Mandatory     : NO
#-----------------------------------------------------------------------------
variables=

#-----------------------------------------------------------------------------
# Name          : initParams
# Datatype      : String
# Description   : comma separated list of name=value pairs. Overrides initialization parameters defined in templates
# Default value : None
# Mandatory     : NO
#-----------------------------------------------------------------------------
initParams=

#-----------------------------------------------------------------------------
# Name          : sampleSchema
# Datatype      : Boolean
# Description   : Specifies whether or not to add the Sample Schemas to your database
# Valid values  : TRUE \ FALSE
# Default value : FASLE
# Mandatory     : No
#-----------------------------------------------------------------------------
sampleSchema=true

#-----------------------------------------------------------------------------
# Name          : memoryPercentage
# Datatype      : String
# Description   : percentage of physical memory for Oracle
# Default value : None
# Mandatory     : NO
#-----------------------------------------------------------------------------
memoryPercentage=

#-----------------------------------------------------------------------------
# Name          : databaseType
# Datatype      : String
# Description   : used for memory distribution when memoryPercentage specified
# Valid values  : MULTIPURPOSE|DATA_WAREHOUSING|OLTP
# Default value : MULTIPURPOSE
# Mandatory     : NO
#-----------------------------------------------------------------------------
databaseType=OLTP

#-----------------------------------------------------------------------------
# Name          : automaticMemoryManagement
# Datatype      : Boolean
# Description   : flag to indicate Automatic Memory Management is used
# Valid values  : TRUE/FALSE
# Default value : TRUE
# Mandatory     : NO
#-----------------------------------------------------------------------------
automaticMemoryManagement=

#-----------------------------------------------------------------------------
# Name          : totalMemory
# Datatype      : String
# Description   : total memory in MB to allocate to Oracle
# Valid values  :
# Default value :
# Mandatory     : NO
#-----------------------------------------------------------------------------
#totalMemory=3096

EOF
# End Step 17 - Install Configuration Assistant Response File
Step 18 – Make Directories and Run Database Configuration Assistant
As the oracle user, copy and paste the following set of commands into your PuTTY session.
# Begin Step 18 - Make Directories and Run Database Configuration Assistant
mkdir /u01/app/oracle/oradata
mkdir /u01/app/oracle/flash_recovery_area
dbca -silent -createDatabase -responseFile /u01/app/oracle/product/19.3.0/dbhome_1/assistants/dbca/dbca.rsp
# End Step 18 - Make Directories and Run Database Configuration Assistant
Running this could take a while. After this, though, you will have running Oracle Database!
When the installation completes, go ahead and give it a test: Copy and paste the following command into your PuTTY session as the oracle user.
# Begin Testing New Oracle Database
echo "set pagesize 500 linesize 150
select 'A hundred congratulations on your new Oracle Database! (This is congratulation number ' || rownum || ')' x
from dba_objects
where rownum <= 100;
exit;" | sqlplus / as sysdba
# End Testing New Oracle Database
Connection info:
Hostname: <whatever your DigitalOcean Droplet’s IP is>
Port: 1521
SID: ora19c
SYS Password: Testora19c#
SYSTEM Password: Testora19c#
DBSNMP Password: Testora19c#
If You Want Enterprise Manager
Copy and paste the following command as the oracle user into your PuTTY session:
echo 'exec dbms_xdb_config.SetGlobalPortEnabled(TRUE);' | sqlplus / as sysdba
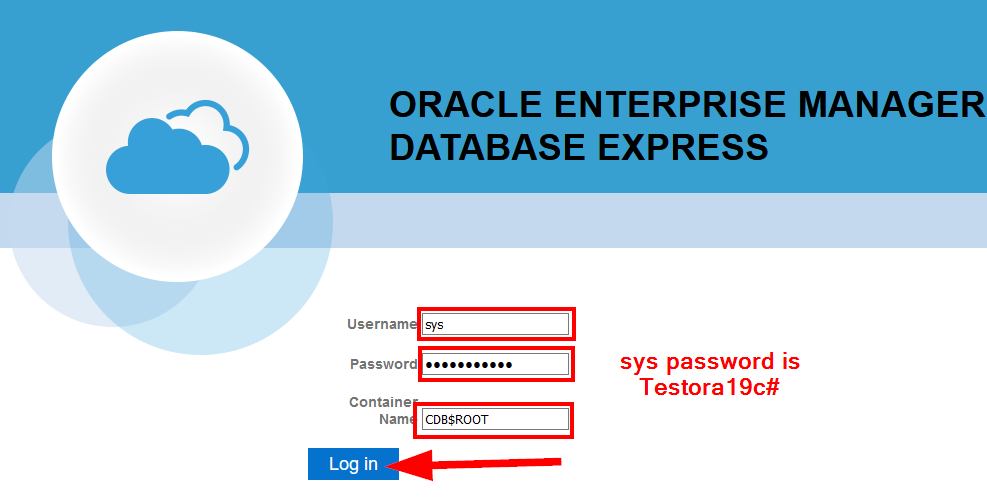
In your browser, go to the URL for enterprise manager:
https://<your droplet’s IP>:5510/em
Enter the following info:
Username: sys
Password: Testora19c#
Container Name: CDB$ROOT
Go Back and Delete the Zip File
Install is done–you can safely delete that zip file.
rm /u01/app/oracle/product/19.3.0/dbhome_1/LINUX.X64_*_db_home.zipONE LAST STEP
CHANGE YOUR SYS AND SYSTEM PASSWORD!!! Remember that an attacker with access to SYS and or SYSTEM could EASILY gain access to your operating system and use your server for whatever they want.
There you have it! Enjoy!!
Free Oracle SQL Tuning Guide
Checkout my FREE guide, 7 SQL Tuning Secrets You Can Use Immediately, Even If You’ve Never Tuned a Query In Your Life!
Get it here: tuningsql.com/secrets

Wow! This is the best tutorial I read for a long time 🙂
Congrats!
One word.
This tutorial is just perfect!!!!
Thanks man.
Happy to help! 🙂